Welcome to my blog, hope you enjoy reading
RSS

Tuesday, March 30, 2010

Project 2: What to do next?!

Ever feel, when you look around your house, that it's all just too much; there's too much to do it's all a little overwhelming? That's me, right now.

I have a cluster of projects just waiting for me to pull my finger out get cracking on. But which one?! They all seem as important as eachother - there's the fireplace to makeover, because I can't stand looking at that ugly brick facade one second longer than required; a table in need of a new colourful coat of paint; some book covers to cut up and make into butterfly wall art; some throw pillows to be sewed; and I think my bed could do with a new duvet..

I wish there were more hours in the day!

Anyhoo, since actually beginning to write this post and now (I've left it and come back, slightly more clear headed than before) I think I'm going to go with the fireplace makeover. Here is a photo of the 'beast' for your viewing pleasure. I've tried to tart it up with a few photos and strategically placed artworks, but as you can see, this monstrosity is pretty hard to disguise. Trust me though, I think the photo actually makes it look a bit nicer than it is, but DO NOT be fooled!

She is one frightful looking mo-fo, see:


I've been looking for inspiration online on how to give this baby a bit of a facelift. I'd like to think I could do something more than just painting it out, white.
I have some gorgeous Florence Broadhurst wallpaper off-cuts that I have been saving up for a special project, and perhaps this is it!


Gorgeous, huh!

On top of painting out the ugly bricks, my thinking at this stage is to make my own cover to fit over the hole (where the big A1 bit of cardboard - which is actually my 7th form design folio - is sitting right now, to keep the draft out); perhaps out of mdf or just foam board, and covering that with the wallpaper. I would maybe line the back of the recessed shelf with wallpaper too.. or again, cover a piece of foam board and pop it in there, just to pretty it up a bit.

What do you think?


Sunday, March 28, 2010

Project 1: Complete!

Yippeeee I'm done! The tree decal is finally finished and I'm really happy with it. So is Lila, which is a bonus! I cut out some birds (you can just see one in the top right corner) from a CottonOnKids bag and stuck them on and we ask Lila to point them out, which she does so with glee. It's funny though, she only has a few words in her vocabulary at the moment: 'Mama', 'Dada', 'Yay', 'Teddy' (which comes out 'te-dahh') and now birdy. Except she says 'dirday'. Which is both ridiculously cute and hilarious all at the same time.


Do you think it has enough plumage though? I kept staring at it thinking I should be adding more leaves.... of which there were far more than I had expected! I did, in the end, rummage through my box of wrapping paper off cuts, cut up an old gift bag someone gave me, and borrow a roll from my Mum. The thinner paper worked, but it's not as hardy as the wallpaper or scrapbooking card - but still did the job and added a bit more colour too, which I like.


So, the big question - how much did this cost me (not counting the supplies I already had or begged, stole or borrowed to get)? Here's a rundown:

Vintage Wallpaper $40.00
Scrapbooking paper $ 8.00
Wallpaper Paste $13.00
Extra Glue ($2 Shop) $ 2.00

TOTAL: $63.00


So BUMS, I failed to reach my target of $50 :( But I blame it on the fact I couldn't steal any wallpaper paste from anyone in my immediate family. The cheek! I managed to get size, for some reason, but not the paste. Still, knowing how much these decals kits cost to buy in the real world - I'm happy with being a tenner or so over.

Will you chastise me for this? I HOPE NOT!

Next project will definitely be less than $50. YES IT WILL BE!!!


Thursday, March 25, 2010

Finds of Fancy

I thought I'd do a regular column highlighting all the fancy things I've found in my net journeys during the week, or things I've had stored in my favourites for ages and neglected to share.

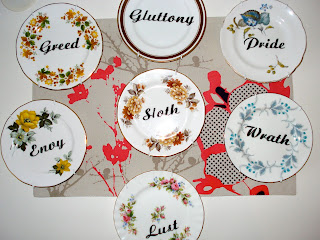
This week - going with the plates theme, I would like to introduce to you a clever local lass who goes by the name Trixie Delicious. She scribbles on vintage plates. Usually with dirty words (you have been warned), and they are wooooonderful! In fact, I have a fabulous set of my own that my adoring boy bought me for my birthday.


These have unfortunately been lying, hidden in a box in the spare room instead of brightening up my walls, because the wall I *think* I want to put them on isn't quite ready yet. If they do end up going there, it'll have to wait until it's painted. Makes me sad to think they're wasting away in the dark, but they will come out soon!! Poor plates *sad face*.

Over on Trixie's blog I also spotted this gorgeous creation!


I love this tiered version of my Seven Deadly Sins plates!
I have a stash of super cute tiered cake stands aswell; bought and handmade. But I won't be scribbling on them as I want to use them on a grandiose dessert table at my wedding (which probably wouldn't looks as chic with swears).

If you want your very own slice of Trixie Delicious, go to her blog or trixiedelicious.com for links to her shop. Or if you're in Auckland, she exhibits at Kraftbomb which happens to be on this weekend! Lucky us!


Wednesday, March 24, 2010

25 DIY Projects That Cost Less Than $50


It's like this was written especially for me! apartmenttherapy.com has pulled together a bunch of really clever ideas to spruce up your space that cost, as the title suggests, $50 or (even better) MUCH less! Me likey!!

I especially love these butterflies made out of wood veneer; and actually, I have a few tricks of my own to share on how you can make gorgeous butterfly art from old scraps of paper etc that you might have lying around the joint; so stay tuned for that!
In the mean time, check out this fabulous list and get crafty! And, if you have a clever creation to share, please email it to me here.

Project 1: Almost done!

I've spied so many cool things to post about this week, but i've been staying away for fear that if you see me posting anything other than photos of my current project, you'll just think I'm a fraud, get bored and move on. And fair enough! Not that that's an open invitation to 'de-follow' me... so don't.
Anyway, you'll be pleased to hear that after a bloody busy week and a whole lot of cutting, I've finally had a chance to get pasting! At the moment it is 70% finished - just need to finish sticking on all the leaves so it looks a bit more lush - but here is the progress so far:


Now, as you know, I ran out of vintage wallpaper to make the leaves, so I have to make do with scrapbooking paper from Spotlight. I think it looks really good though! I just hope the regular paper sticks as well with the wallpaper paste as the actual wallpaper does. Time will tell!
I figure if it does start to peel, I will just stick down any loose edges with wallpaper glue. Easy.
I have quite a few leaves yet to stick on, but Baby is asleep so that will have to wait.

Just a thought: if you wanted to get more bang for your buck than the scrapbooking paper (not that it's particularly expensive), you could use wrapping paper. They have some really gorgeous designs available in those A2 sheets in places like Whitcoulls, that aren't folded. They'd be great too - just watch how much glue you slap on those babies.

So there we are - hopefully I can post a pic of the finished product tomorrow, along with the 'how to' guide and a cost sheet.


Thursday, March 18, 2010

Do you hate your walls? Gotta Sharpie handy?

Now, this is a GREAT idea for those of us who want that flash designer wallpaper but don't have a spare $350 to spend on EACH roll (insert LARGE *sigh*. Again, this is something that physically hurts me; that I can't have this. Seriously. Palpatations).
BUT there is hope on the horizon! If you can draw, or at least have a steady hand and aren't afraid to do something RAD-I-CAL (and not at all worried about your beloved walking in on you and upon finding you halfway up a ladder with a big fat marker in your hand, about to draw on the walls he spent 6months carefully painting, decides to make a beeline for that new dress you just bought at Zambesi.. AND he has SCISSORS!), then heck, by all means have a go!


Take a close look - that ain't wallpaper!


See, all you need is a gold marker and some balls. Bob's your uncle!

WARNING!!! I hate to have to add one, because I wouldn't want to discourage anyone from trying this, but here's a trap for young players. I actually tried this in my lounge, and failed miserably. This is because when we moved into our house, it was adorned with hideous and badly hung wallpaper in a few rooms, and I decided that I just couldn't live with it like that and decided to paint it out as a stop gap.
When I saw this idea and went to try it, the paint on the walls reacted with my paint pen and it just kind of 'stuck' and glugged up the pen and the ink stopped flowing properly and I got a grand 2 half lines into my design and had to quit! This made me very sad, but at least I have tried and tested this for you and can safely warn you NOT to try this if you've painted over wallpaper and the finish is a bit sticky and icky and not completely kosher. On plain painted walls, like most normal houses, it'd be fine. No worries. All feel sorry for me and my boring white walls now, please. And go forth and prosper!

Find out more here on Kellie's Scraplog.


Can someone please buy me this:


I LOVE both of these rugs from American furniture/homewares designer Angela Adams that I spotted on Decor8. And I love the sideboard too. I have been searching for one forever but unfortunately none seem to be in my (limited) price range. Even the really ugly ones! It hurts me to think I can't just go out and splurge a few thousand dollars on a timeless, superbly designed piece of furniture, which I would love and cherish and polish and admire forever more. I'd even go as far to say it rips my knickers. I just wish I'd paid more attention in woodwork so I could just make one; or that a hoarding old Aunt 5 times removed, who I met once when I was 5 but was so taken with tiny (and infinitely charming) me that she leaves me a 1950s danish designed vintage sideboard in mint condish. Well, a girl can dream.... For now I'll just keep coveting them longingly on Trade Me and hoping that one day that dollar reserve auction only reaches $39.99 and the jokes on That Guy, who thought 3 grand would be a cinch. PAH!

Wednesday, March 17, 2010

I heart these dining rooms

So, in order to distract anyone reading from my slow progress, I decided to showcase a few gorgeous dining rooms I've come across in my net travels.
The dining room is actually my next 'project'. It's a work in progress at the moment. It doesn't really fit into my theme of budget makeovers though, as it's already cost us $900 to re gib the walls and take out part of one that was blocking the kitchen. Open plan really has revolutionised meal time! Anyway, on with the pictures of pretty things:

This selection comes to you via of desiretoinspire.net.

I heart this one because it's a little bit vintage.


I heart this one because of the mis-matched chairs and the splendid lightshade.


I heart vintage sideboards.

I heart the clever as all hell plate arrangement and plan to steal this idea for mai own.

I heart MASSIVE book libraries. I only wish I owned enough actual books to recreate this properly!

Tuesday, March 16, 2010

I'm not lying!

Before you ask - YES! I have started.. I just can't right now finish because I have run out of paper to make the leaves with; and besides, I can't get into my daughters' room when I have a spare moment to glue anything to the wall during the day because when that happens, she's asleep! So you see my conundrum. I will remedy this soon though.. and it will be magnificent, in ways you cannot imagine!! OH. EM. GEE. YES.

Friday, March 12, 2010

Project 1: VINTAGE WALLPAPER TREE DECAL


Thought I would post a few examples of what I'm going to create. The bottom one is from Inke a fantastic company based in the Netherlands that makes wallpaper silhouettes out of vintage wallpaper. I first saw one of these trees in an Australian magazine Real Living when I was living over there. I am obsessed with that magazine; it's like DIY porn to me. So many cool ideas that you can totally steal, that won't break the bank. And hey, I'm all about that at the moment! I must admit, I'm a bit of a 'oh how hard can it be? I can totally do that!' optimist when it comes to making things. Sometimes I succeed and sometimes I fail miserably; but somehow that doesn't stop me believing that I really do have crafty super-skillz.

I suppose that's why the Tree appealed. I can draw, and I can use a pair of scissors so instantly I think this is going to be easy, ha! But also I just love the idea of it because; A. it will look like I have made it myself, and I love that. It won't be perfect, but it will be perfectly charming; and B. I love the idea of taking something that might seem unusable in this era....


and 'upclycling' to create something really freakin cool!

WATCH THIS SPACE!


Thursday, March 11, 2010

Project 1: It's coming!

So I have decided to make a giant tree wall decal for my daughter's room out of vintage wallpaper that I brought on Etsy. I think it cost me $35 all up for the paper. It's gorgeous stuff. I have a 70s geometric pattern to use as the trunk, and some lovely florals to use as decorative leaves. I have had this on the back-burner for a few months now. So when I saw this hilarious diagram I had to share it - because it's pretty much 'me' in a nutshell. Although, with this blog it's a habit i'm hoping to break!

I will start the project tomorrow (ha! ironic) and charge my camera batteries so I can keep a record and show off my masterful skills when it's complete. I will keep a track of extra materials and how much they cost and even include a 'how to' guide. Exciting, i know!

Tuesday, March 9, 2010

Operation: Make A Pretty House With Next To No Money

Sounds... difficult, right?

Well, I'm up for the challenge! I am Natalie, and along with my partner Nick, we have purchased a 'rustic' bungalow in Auckland's North Shore suburbs in the hope of creating our very own haven to raise our young family in.

Our house is old. 1930s old. And with a lot of half finished projects undertaken by the former owners, which make the place both ripe for rejuvenation and a bit of a headache at the same time!

It's going to be a mammoth task to bring this baby into the 21st century. And I know I won't be able to do it all on my tiny fortnightly budget - obviously you can't replace entire walls for that, but
what I can do is make it pleasantly livable - even stylish - with a bit of imagination and creativity and some good old upcycling!

I suppose I decided to blog about it so I would actually do it, instead of just talking about it!

I have lost count of all the hours I spend trawling the net for decorating blogs and crafty ideas that I can steal and use in my own home. I keep a notepad which always has a list a mile long of 'things to do' or 'projects to start', which with working and looking after my toddler, often get pushed aside.

So this is my challenge: Make over my house $50 at a time (I said it was tiny!). That's $50 per project. Or less. Whatever it takes to be thrifty; whatever junk I can reuse or reinvent to keep to my budget - I will do my best!

I will post some photos soon so you get an idea of what I'm dealing with..

But let it be known, it will not be drab and boring for much longer! And my pocket will not be (completely) emptied either. If you are reading this and are one of the many people with 'do-ups', scratching your head and wondering how on earth you can make your nest a comfy place to rest without going broke, perhaps we can inspire eachother? Or if you are a creative cat with good ideas to share, then please do!

So - onward and upward!

Hmmm.. now, which project to start first...?


Related Posts Plugin for WordPress, Blogger...